A lush, green lawn is not just a beautiful addition to your home; it’s a testament to your dedication to landscaping and lawn care. One of the most critical practices in maintaining a healthy lawn is proper aeration. Aerating your lawn by hand is a cost-effective and environmentally friendly way to ensure your grass roots receive the air, water, and nutrients they need to thrive. In this comprehensive guide, we’ll walk you through everything you need to know about how to aerate a lawn by hand, from understanding the benefits to choosing the right tools and executing the process step-by-step.
Understanding Lawn Aeration
Lawn aeration is the process of perforating the soil with small holes to alleviate compaction and allow air, water, and nutrients to penetrate deeply to the grassroots. This practice is essential for maintaining a healthy lawn because compacted soil restricts root growth and prevents essential elements from reaching the roots effectively. By aerating your lawn, you can promote stronger root systems, improve nutrient uptake, enhance water infiltration, and ultimately, foster vibrant, green grass that enhances your property’s curb appeal.
Benefits of Lawn Aeration
Improved Nutrient Absorption
Aerating your lawn facilitates the movement of essential nutrients such as nitrogen (N), phosphorus (P), and potassium (K) to the root zone of your grass. Compacted soil restricts nutrient flow, preventing roots from accessing these vital elements effectively. By creating channels or holes in the soil, aeration allows fertilizers and organic matter to penetrate deeper, reaching the root system where they are most beneficial.
- Healthy Growth: Nutrients are the building blocks for plant growth. When grass roots receive an adequate supply of nutrients, they can grow stronger, resulting in thicker turf and a lush, green lawn.
- Even Distribution: Aeration helps ensure that nutrients are distributed more evenly throughout the soil. This prevents localized nutrient imbalances that can lead to patchy or unhealthy grass growth.
Enhanced Air Exchange
Compacted soil reduces pore space and restricts the movement of oxygen within the soil. Oxygen is crucial for root respiration, microbial activity, and nutrient uptake. Without sufficient oxygen, roots can become stressed and less efficient in absorbing nutrients and water.
- Improved Soil Structure: Aeration loosens compacted soil, creating air channels that allow oxygen to reach the roots more easily. This promotes healthier root growth and enhances overall soil structure.
- Prevention of Anaerobic Conditions: Anaerobic conditions (lack of oxygen) in soil can lead to the production of harmful gases and inhibit beneficial microbial activity. Aeration mitigates these conditions by promoting aeration and ensuring a healthier soil environment.
Better Water Infiltration and Drainage
Compacted soil is often impermeable, leading to poor water infiltration and drainage issues such as puddling, runoff, and waterlogged areas. Aeration addresses these problems by:
- Enhancing Water Penetration: By creating holes or channels in the soil, aeration allows water to penetrate deeper into the root zone where it is accessible to the grass roots.
- Reducing Surface Runoff: Improved water infiltration reduces surface runoff, minimizing erosion and nutrient loss from the soil surface.
- Preventing Waterlogging: Proper aeration promotes better drainage, preventing water from pooling on the surface and reducing the risk of fungal diseases and root rot.
Reduced Thatch Build-Up
Thatch is a layer of organic debris that accumulates between the soil surface and the actively growing grass. While some thatch is beneficial for protecting roots and conserving moisture, excessive thatch can hinder nutrient and water movement, harbor pests and diseases, and restrict root growth.
- Enhanced Decomposition: Aeration encourages microbial activity in the soil, which accelerates the decomposition of thatch. The holes created by aeration allow beneficial microorganisms to break down organic matter more efficiently.
- Balanced Thatch Levels: Regular aeration helps maintain a healthy balance of thatch, ensuring it decomposes at a rate that does not impede grass growth or soil health.
Enhanced Drought Resistance
Deep, healthy roots are more resilient during drought periods because they can access moisture stored deeper in the soil. Aeration promotes deeper root growth by:
- Encouraging Root Penetration: The channels created by aeration allow roots to penetrate deeper into the soil profile, accessing moisture and nutrients that are essential for survival during dry periods.
- Reducing Surface Evaporation: Improved soil structure and water retention properties reduce surface evaporation, helping to conserve moisture and sustain grass health during drought conditions.
In conclusion, lawn aeration is a fundamental practice for maintaining a healthy and vibrant lawn. By addressing issues of soil compaction, aerating your lawn promotes nutrient absorption, enhances air exchange, improves water infiltration and drainage, reduces thatch build-up, and enhances drought resistance. Incorporating aeration into your lawn care routine can significantly improve the overall health and appearance of your grass, making it more resilient to environmental stresses and promoting long-term sustainability.
For more detailed guidance on how to aerate your lawn by hand and maximize these benefits, refer to our comprehensive guide on hand lawn aeration. Stay tuned to our blog for more lawn care tips and insights!
Signs Your Lawn Needs Aeration
Determining when to aerate your lawn is crucial for maintaining its health and appearance. Various signs can indicate that your lawn might benefit from aeration. By recognizing these indicators early, you can ensure timely intervention, promoting a lush and vibrant lawn. Here are some common signs that suggest your lawn needs aeration:
Compacted Soil
Compacted soil is one of the primary reasons lawns require aeration. Soil compaction occurs due to heavy foot traffic, construction, or the use of heavy equipment on your lawn. Compacted soil restricts root growth, impedes water infiltration, and reduces the availability of oxygen and nutrients.
- The Screwdriver Test: A simple way to check for soil compaction is the screwdriver test. Attempt to insert a screwdriver or a similar tool into the soil. If it’s difficult to push the tool into the ground, your soil is likely compacted and needs aeration.
- Hard Soil Surface: Walk across your lawn. If the ground feels hard and unyielding underfoot, it’s another clear sign of compaction. Healthy soil should feel somewhat springy and soft.
Pooling Water
Proper water infiltration is essential for a healthy lawn. When soil is compacted, water cannot penetrate deeply, leading to surface pooling. This can result in several issues, including root rot and fungal diseases.
- Standing Water: After watering or rainfall, if you observe water pooling on the surface of your lawn rather than being absorbed, it’s a sign of poor infiltration. Aeration helps to break up compacted soil, allowing water to reach the roots more effectively.
- Runoff: Excessive runoff during watering sessions indicates that water is not penetrating the soil. Instead, it flows off the surface, taking valuable nutrients with it. Aeration improves water retention and reduces runoff.
Thatch Build-Up
Thatch is a layer of dead and living organic matter that accumulates between the soil surface and the green grass blades. While a thin layer of thatch can be beneficial, excessive thatch can create problems by restricting water, air, and nutrient movement into the soil.
- Visible Thatch Layer: Inspect your lawn closely. If you notice a spongy layer of thatch thicker than half an inch, it’s time for aeration. Thatch build-up can lead to shallow root systems and increased susceptibility to drought and disease.
- Resistance to Water Penetration: Excessive thatch can act like a barrier, preventing water from reaching the soil. During watering, you might notice that water sits on top of the thatch layer instead of being absorbed.
Thin or Patchy Grass
Healthy, dense grass is a sign of a well-maintained lawn. Conversely, thin, patchy, or yellowing grass often indicates underlying soil compaction issues. When the soil is compacted, grass roots struggle to access the air, water, and nutrients they need, resulting in poor growth and development.
- Slow Growth: If you observe that your grass is growing slowly despite regular watering and fertilization, compacted soil might be the culprit. Aeration can help rejuvenate grass growth by alleviating soil compaction.
- Bald Spots: Areas of your lawn that appear bare or have thin grass coverage are likely suffering from compacted soil. Aeration encourages root expansion and promotes the growth of new grass in these problematic areas.
Increased Weeds and Pests
Compacted soil creates an environment that is less favorable for healthy grass but more suitable for weeds and pests. Weeds can quickly take over areas where grass struggles to grow, and compacted soil can become a breeding ground for various lawn pests.
- Weed Infestation: A sudden increase in weeds such as dandelions, crabgrass, and clover can indicate that your lawn is stressed due to compaction. Aerating the soil can help strengthen your grass, making it more competitive against weeds.
- Pest Damage: Compacted soil can attract pests like grubs and insects that damage grass roots. Signs of pest activity, such as brown patches or irregular growth patterns, can be mitigated through aeration, which improves soil health and grass resilience.
Heavy Foot Traffic
Lawns subjected to heavy foot traffic are more prone to soil compaction. Paths where people or pets frequently walk can become compacted over time, leading to poor grass growth and soil health in those areas.
- Visible Paths: If you notice well-trodden paths where grass struggles to grow, these areas likely need aeration. Creating holes in the soil allows roots to access the necessary nutrients and recover from the stress of foot traffic.
- High-Use Areas: Areas around playgrounds, patios, or frequently used parts of your yard often suffer from compaction. Regular aeration in these spots can help maintain healthy grass despite heavy use.
Recognizing the signs that your lawn needs aeration is the first step towards maintaining a vibrant and healthy landscape. By addressing compacted soil, pooling water, thatch build-up, thin grass, and other indicators promptly, you can ensure that your lawn receives the necessary care to thrive. Regular aeration, combined with proper watering, fertilization, and mowing practices, will keep your lawn looking its best year-round.
Manual Core Aerators
Manual core aerators, also known as coring or plug aerators, are highly effective tools for breaking up compacted soil by removing small plugs of soil from the ground. This method is preferred because it reduces soil compaction without causing further soil displacement. Using a manual core aerator can significantly enhance the health and appearance of your lawn by improving water infiltration, nutrient absorption, and root growth.
How to Use a Manual Core Aerator:
Preparation:
- Mow Your Lawn: Mow your lawn to a suitable height, typically about 1.5 to 2 inches. Shorter grass makes it easier to see where you’ve aerated and ensures that the aerator tines can penetrate the soil effectively.
- Water the Lawn: Water your lawn thoroughly the day before you plan to aerate. The soil should be moist but not soggy. Moist soil allows the aerator to penetrate more easily, making the process less labor-intensive.
- Mark Obstacles: Identify and mark any obstacles such as sprinkler heads, shallow irrigation lines, buried utility lines, and rocks. This precaution prevents damage to your equipment and avoids accidents during aeration.
Using the Aerator:
- Grip the Handle: Firmly grip the handle of the manual core aerator. Most models have a T-handle or similar design for a secure grip.
- Press the Tines: Position the aerator tines on the ground and press down using your foot on the foot bar (if available) for added leverage. The hollow tines will penetrate the soil and remove plugs of soil as you lift the aerator back up.
- Create Holes: Continue to press and lift the aerator systematically across your lawn. Aim to create holes spaced about 3-4 inches apart for optimal aeration.
Aerating in Sections:
- Work Methodically: Divide your lawn into manageable sections and work on one section at a time. Ensure overlapping passes to achieve even aeration across the entire lawn.
- Clear Debris: Periodically clear any soil plugs or debris that accumulate in the tines to maintain the aerator’s effectiveness.
Post-Aeration Care:
- Leave Soil Plugs: Allow the soil plugs to remain on the lawn surface. They will break down naturally over time, returning valuable nutrients to the soil.
- Water Lightly: Water the lawn lightly after aeration to help settle the soil and promote root growth.
- Fertilize and Seed: For best results, consider fertilizing and overseeding your lawn after aeration. The new holes provide excellent seed-to-soil contact and allow fertilizers to reach the root zone more effectively.
Manual Spike Aerators
Manual spike aerators penetrate the soil with solid tines instead of removing soil plugs. While they are simpler in design and often less expensive, they may not be as effective in reducing soil compaction compared to core aerators. However, they are still useful for improving air and water penetration in moderately compacted soils and can be used more frequently without significant disruption to your lawn.
How to Use a Manual Spike Aerator:
Preparation:
- Mow Your Lawn: Cut your grass to a suitable height, similar to the preparation for core aeration. Shorter grass facilitates easier movement of the aerator and better visibility of the aeration pattern.
- Water the Lawn: Ensure the soil is moist by watering the lawn the day before aeration. Moist soil allows the spike aerator to penetrate the ground more easily.
- Mark Obstacles: Identify and mark any obstacles such as sprinkler heads, shallow irrigation lines, and rocks to avoid damaging them during aeration.
Using the Aerator:
- Grip the Handle: Hold the handle of the spike aerator firmly. Most models have a handle design that provides a comfortable grip.
- Press the Tines: Position the solid tines on the ground and press down using your foot to drive the tines into the soil. Lift the aerator out and repeat the process, ensuring thorough coverage of the area.
- Create Holes: Continue to create holes systematically across your lawn, aiming for spacing similar to that used with a core aerator, about 3-4 inches apart.
Aerating in Sections:
- Work Methodically: Divide your lawn into sections and work on each section in a methodical manner, ensuring overlapping passes for even aeration.
- Maintain Consistency: Ensure consistent pressure and depth with each penetration to achieve uniform aeration across the lawn.
Post-Aeration Care:
- Topdressing: Consider topdressing your lawn with compost or sand after using a spike aerator. This helps to improve soil structure and provides additional nutrients to the grass.
- Water Lightly: Water the lawn lightly to help settle the soil and promote recovery.
- Fertilize and Seed: As with core aeration, fertilizing and overseeding after aeration can enhance the benefits, providing a boost to grass health and promoting thicker growth.
Choosing the Right Tool
When deciding between a manual core aerator and a manual spike aerator, consider the specific needs of your lawn:
- Core Aerators: Best for severely compacted soil, heavy clay soils, and lawns that require significant aeration. They are more effective at reducing soil compaction and promoting deeper root growth.
- Spike Aerators: Suitable for moderately compacted soil and lighter aeration needs. They can be used more frequently and are easier to operate, making them a good choice for regular lawn maintenance.
Aerating your lawn by hand with either a core aerator or a spike aerator can significantly improve its health and appearance. By understanding the benefits of each tool and following the proper techniques, you can ensure that your lawn receives the care it needs to thrive. Regular aeration, combined with appropriate watering, fertilization, and mowing practices, will keep your lawn looking its best year-round. Stay tuned for more detailed sections on additional aeration tools, methods, and comprehensive lawn care strategies to help you achieve the perfect lawn.
Spading Forks
Spading forks, though less common for large lawns due to their manual nature, are effective for smaller areas or spot treatments where precision is required. These tools, also known as digging forks or garden forks, consist of a handle and several sturdy tines that penetrate the soil. While they may be more labor-intensive compared to other aerating tools, spading forks are invaluable for detailed work in tight or hard-to-reach areas.
How to Use a Spading Fork:
Preparation:
- Mow Your Lawn: Begin by mowing your lawn to a manageable height, typically around 1.5 to 2 inches. This makes it easier to handle the spading fork and see the areas that need aeration.
- Water the Lawn: Water your lawn thoroughly the day before you plan to aerate. The soil should be moist but not waterlogged. Moist soil will make it easier for the fork to penetrate and reduce the physical effort required.
- Mark Obstacles: Identify and mark any obstacles such as sprinkler heads, utility lines, or other potential hazards. This helps prevent accidental damage during the aeration process.
Using the Fork:
- Grip the Fork: Hold the spading fork with both hands, ensuring a firm grip. The handle should be at a comfortable height for you to exert downward pressure.
- Insert the Tines: Position the fork tines perpendicular to the soil surface and press down firmly with your foot on the foot bar or the top of the fork. Insert the tines as deeply as possible into the soil.
- Rock the Fork: Once the tines are fully inserted, rock the fork back and forth to create holes in the soil. This motion helps break up compacted soil and allows air, water, and nutrients to penetrate more effectively.
- Repeat the Process: Move systematically across the lawn, inserting the fork at regular intervals (approximately 4-6 inches apart) to ensure thorough coverage.
Aerating in Sections:
- Work Methodically: Divide your lawn into manageable sections and work on one section at a time. Spading forks are ideal for addressing compacted spots or reaching areas that are inaccessible to larger aerating tools.
- Target Problem Areas: Focus on areas with visible signs of compaction, poor growth, or water pooling. Spading forks allow for precise aeration, making them suitable for spot treatments in problem areas.
Post-Aeration Care:
- Water Lightly: After aerating, water the lawn lightly to help settle the soil and promote recovery. Moisture encourages the grass roots to expand into the newly created spaces.
- Apply Compost: Consider applying a light layer of compost or organic matter over the aerated areas. This helps improve soil structure, enhances nutrient availability, and promotes healthier grass growth.
- Monitor and Maintain: Keep an eye on the aerated areas over the following weeks. Regular watering, mowing, and fertilizing will help your lawn recover and thrive.
Advantages of Using a Spading Fork
While spading forks are more labor-intensive compared to other aerating tools, they offer several advantages, especially for small lawns or specific problem areas:
- Precision: Spading forks allow for targeted aeration in compacted spots or areas that are difficult to reach with larger tools.
- Control: The manual nature of spading forks gives you better control over the depth and placement of aeration holes.
- Versatility: In addition to aerating lawns, spading forks are useful for other gardening tasks such as turning compost, breaking up soil clumps, and planting.
Disadvantages of Using a Spading Fork
Despite their benefits, spading forks also have some drawbacks:
- Labor-Intensive: Aerating with a spading fork can be physically demanding and time-consuming, especially for larger areas.
- Limited Coverage: Due to their manual nature, spading forks are best suited for small lawns or specific spots rather than extensive aeration projects.
Spading forks are an effective and versatile tool for manual lawn aeration, particularly for small lawns or spot treatments. By following the proper techniques and focusing on preparation, systematic aeration, and post-aeration care, you can enhance the health and appearance of your lawn. Combining the use of spading forks with other aerating tools, such as manual core or spike aerators, can provide comprehensive lawn care and ensure your grass remains lush, green, and resilient.
Aerator Shoe Spikes
Aerator shoe spikes are a convenient and straightforward option for lawn aeration, particularly for maintaining aeration between more intensive sessions. While they may not be as effective as manual core or spike aerators in alleviating severe soil compaction, they offer a practical solution for light, routine aeration. These devices consist of flat, sturdy soles with multiple spikes attached to the bottom, which can be strapped over your regular footwear.
How to Use Aerator Shoe Spikes:
Preparation:
- Mow Your Lawn: Start by mowing your lawn to a manageable height. This step makes it easier to walk across the lawn and ensures the spikes can penetrate the soil effectively.
- Water the Lawn: Water the lawn thoroughly the day before you plan to aerate. Moist soil is easier to penetrate and reduces the physical effort required.
- Wear Appropriate Footwear: Secure the aerator shoe spikes over sturdy footwear, such as work boots or hiking shoes. Ensure the spikes are tightly fastened to prevent slipping.
Using the Spikes:
- Walk Systematically: Begin walking across the lawn in a systematic pattern. It’s essential to cover the entire lawn evenly to achieve consistent aeration. Walk slowly and apply firm pressure with each step to ensure the spikes penetrate the soil adequately.
- Overlap Passes: To ensure thorough coverage, make multiple passes over the lawn, overlapping your steps slightly. This helps to aerate areas that might have been missed during the initial pass.
- Focus on High-Traffic Areas: Pay extra attention to high-traffic areas where soil compaction is more likely. These areas often benefit the most from aeration.
Aerating in Sections:
- Divide the Lawn: For larger lawns, divide the area into manageable sections and work on one section at a time. This approach ensures that you do not miss any areas and allows for a more organized aeration process.
- Revisit Problem Areas: After completing the initial aeration, revisit any areas that appear particularly compacted or have shown signs of poor growth. Additional passes with the aerator shoe spikes can help alleviate compaction in these spots.
Post-Aeration Care:
- Water Lightly: After aerating, water the lawn lightly to help settle the soil. This step encourages the grass roots to expand into the newly created spaces, promoting healthier growth.
- Topdressing: Consider applying a light layer of compost, sand, or organic matter over the aerated lawn. Topdressing helps improve soil structure, enhances nutrient availability, and supports grass recovery.
- Overseeding: If your lawn has thin or bare patches, overseeding after aeration can be beneficial. The aeration holes provide an excellent environment for grass seeds to establish, leading to a thicker, more resilient lawn.
Advantages of Using Aerator Shoe Spikes
While aerator shoe spikes may not be as effective as core or spike aerators for heavy compaction, they offer several benefits:
- Convenience: Aerator shoe spikes are easy to use and require minimal setup. Simply strap them onto your shoes and walk across the lawn.
- Cost-Effective: These tools are generally less expensive than other aeration equipment, making them a budget-friendly option for routine lawn maintenance.
- Minimal Disruption: Aerator shoe spikes cause minimal disruption to the lawn surface, making them suitable for regular use without significantly affecting the appearance of your lawn.
Disadvantages of Using Aerator Shoe Spikes
Despite their convenience, aerator shoe spikes have some limitations:
- Limited Depth: The spikes on these shoes may not penetrate the soil as deeply as manual core or spike aerators, reducing their effectiveness in alleviating severe compaction.
- Effort Required: Walking across the lawn to achieve through aeration can be physically demanding, especially for larger areas.
- Less Effective for Heavy Compaction: Aerator shoe spikes are best suited for light aeration and maintenance. For heavily compacted soil, more robust aeration methods may be necessary.
Aerator shoe spikes provide a practical and convenient solution for maintaining lawn aeration, particularly for routine maintenance between more intensive aeration sessions. By following the proper techniques and focusing on systematic coverage and post-aeration care, you can enhance the health and appearance of your lawn. While they may not replace the need for more effective aeration tools for severe compaction, aerator shoe spikes can play a valuable role in your lawn care regimen.
Choosing the Right Time for Aeration
Timing plays a crucial role in the success of lawn aeration. Performing this task at the optimal time ensures maximum benefit for your grass and minimizes stress on the lawn. Here, we’ll explore the best times to aerate based on the type of grass and specific conditions to avoid.
Best Times for Aeration:
Cool-Season Grasses: Cool-season grasses, such as Kentucky bluegrass, fescue, and ryegrass, thrive during the cooler months of the year. Therefore, the ideal times for aeration are:
- Early Spring: Aerating in early spring helps prepare the lawn for the upcoming summer. It allows water, air, and nutrients to penetrate the soil just as the grass is coming out of dormancy and starting to grow actively. This timing supports root development and strengthens the grass before the heat of summer.
- Fall: Fall is the best time to aerate cool-season grasses. The cooler temperatures and increased moisture create perfect conditions for the grass to recover from the stress of summer. Aeration in the fall promotes root growth and prepares the lawn for the winter dormancy period, ensuring it emerges healthy and robust in the spring.
Warm-Season Grasses: Warm-season grasses, including Bermuda grass, Zoysia grass, and St. Augustine grass, perform best in warmer temperatures. The optimal times for aeration are:
- Late Spring: Aerate warm-season grasses in late spring or early summer when they are in their peak growing season. Aeration during this period ensures that the grass can recover quickly and take full advantage of the growing conditions to repair any damage caused by aeration.
- Early Summer: This is also an acceptable time for aeration, as long as it coincides with the active growing period of the grass. Avoiding aeration during the dormant winter months or the peak heat of summer is crucial to prevent stressing the grass unnecessarily.
Avoid Aeration During:
Frozen Ground: Attempting to aerate frozen soil can be highly detrimental. The process can damage grass roots and disrupt soil structure, leading to long-term issues. Ensure that the ground is thawed and the soil is workable before aerating.
Extreme Heat: Aerating during periods of extreme heat can stress the lawn significantly. High temperatures can cause the soil to dry out quickly, making it harder for the grass to recover from the aeration process. It’s best to aerate during mild weather conditions to support healthy grass recovery.
Additional Tips for Effective Lawn Aeration
Achieving optimal results from manual lawn aeration requires attention to detail and proper technique. Consider these additional tips to enhance your aeration process:
Lawn Preparation:
Mowing: Before aerating, cut the grass slightly shorter than usual. This makes it easier for the aerating tools to penetrate the soil and ensures that the lawn receives maximum benefits from the aeration process.
Watering: Water the lawn thoroughly the day before you plan to aerate. Moist soil is easier to work with and reduces the physical effort required to insert aerating tools into the ground. However, avoid over-watering, as overly wet soil can become muddy and make aeration less effective.
Aerating Techniques:
Overlap Passes: Ensure thorough coverage by overlapping each pass of the aerating tool. This technique helps prevent missed spots and promotes even soil disruption. Overlapping ensures that the entire lawn benefits from the aeration process, promoting uniform growth and health.
Depth of Aeration: Aim for a depth of approximately 2-3 inches when aerating. This depth is sufficient to alleviate soil compaction without excessively disturbing the grass roots. Consistent depth across the lawn ensures that the roots receive the necessary air, water, and nutrients to thrive.
Post-Aeration Care:
Soil Amendments: After aerating, consider topdressing the lawn with compost, sand, or a mix of both. This practice improves soil structure, enhances nutrient availability, and helps the soil retain moisture. The added organic matter breaks down over time, enriching the soil and supporting healthy grass growth.
Overseeding: Combining aeration with overseeding can yield significant benefits. The aeration holes provide an excellent environment for grass seeds to establish, leading to a thicker, more resilient lawn. Choose high-quality grass seed suited to your lawn’s specific needs and follow up with proper watering to ensure successful germination and growth.
Regular Maintenance:
Aeration Frequency: Schedule lawn aeration as part of your regular maintenance routine to ensure long-term health and vigor of your grass. Depending on your soil type and lawn usage, aim to aerate once or twice a year for optimal results. Regular aeration prevents soil compaction from becoming severe and maintains a healthy lawn environment.
Monitoring and Adjusting: Regularly monitor your lawn for signs of compaction and adjust your aeration schedule as needed. Factors such as soil type, foot traffic, and weather conditions can influence how often your lawn requires aeration. By staying attuned to your lawn’s needs, you can ensure that it remains healthy and attractive throughout the year.
Advanced Aeration Techniques
For those looking to take their lawn care to the next level, there are advanced aeration techniques and strategies that can further enhance the health and appearance of your grass. These methods may require additional tools or expertise, but they can yield impressive results.
Liquid Aeration:
Liquid aeration involves applying a special liquid solution to the lawn that penetrates the soil and breaks down compaction. This method can be a good alternative for those who find manual aeration too labor-intensive. Liquid aerators contain ingredients like surfactants and enzymes that create microscopic pores in the soil, allowing air, water, and nutrients to reach the grass roots.
How to Use Liquid Aerators:
- Preparation: Mow and water the lawn as usual before applying the liquid aerator.
- Application: Follow the manufacturer’s instructions for mixing and applying the liquid aerator. Use a garden sprayer or hose-end sprayer to distribute the solution evenly across the lawn.
- Post-Application Care: Water the lawn lightly after applying the liquid aerator to help the solution penetrate the soil. Continue with regular lawn maintenance practices to support healthy growth.
Combination Techniques:
Combining different aeration methods can be highly effective, especially for lawns with severe compaction or specific problem areas. For example, using a manual core aerator for the main lawn areas and a spading fork for precise spot treatments can address various levels of compaction and ensure comprehensive aeration.
Steps for Combination Techniques:
- Assess the Lawn: Identify areas with severe compaction and those that need lighter aeration.
- Select Tools: Choose the appropriate aeration tools for each section. Use a core aerator for general aeration and a spading fork for targeted spots.
- Systematic Approach: Work systematically across the lawn, using the core aerator first and then addressing specific areas with the spading fork.
- Post-Aeration Care: Follow up with topdressing, overseeding, and watering to enhance soil structure and support grass recovery.
By implementing these advanced techniques, you can achieve a healthier, more resilient lawn that withstands various environmental stresses and remains attractive year-round.
Next, we’ll explore common mistakes to avoid during the aeration process and provide troubleshooting tips for overcoming challenges that may arise. This will ensure you have the knowledge and confidence to execute lawn aeration successfully and maintain a beautiful, healthy lawn.
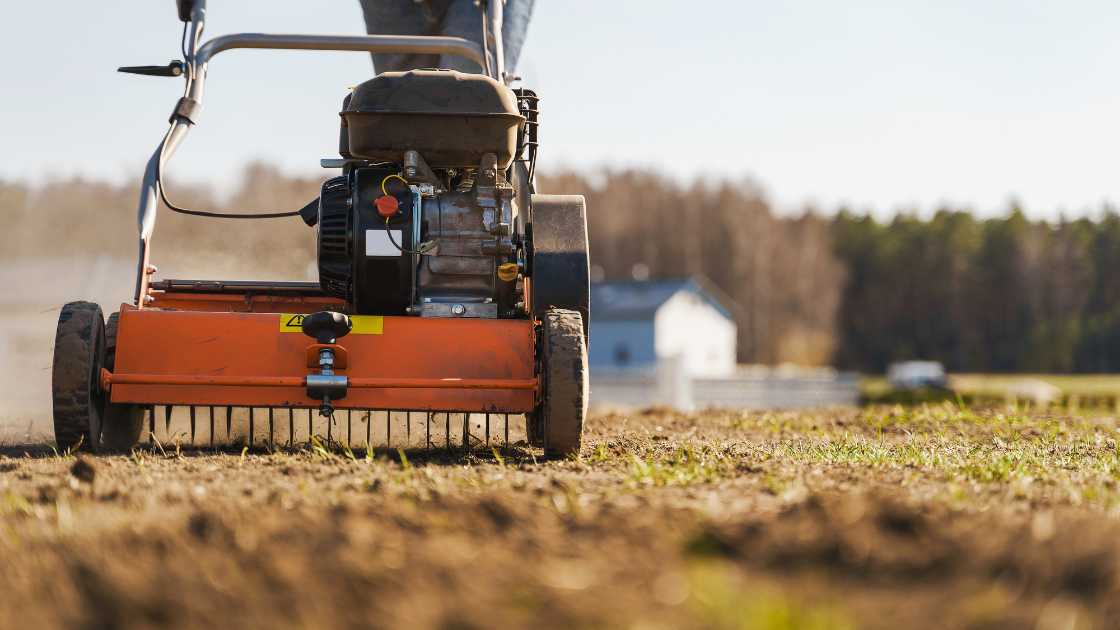
Benefits of Hand Aeration vs. Machine Aeration
Understanding the advantages of hand aerating your lawn compared to using machines can help you make an informed decision based on your lawn’s specific needs and your personal preferences. Both methods have their own unique benefits, and choosing the right one depends on various factors, including the size of your lawn, the extent of soil compaction, and your environmental concerns.
Benefits of Hand Aeration
Control and Precision: One of the primary advantages of hand-operated aeration tools is the level of control and precision they offer. When using manual tools like core aerators or spading forks, you can target specific areas that require more attention. This is particularly beneficial for smaller lawns, gardens with intricate designs, or lawns with irregular shapes where maneuvering a machine may be challenging. Precision aeration ensures that every part of your lawn receives adequate treatment, promoting even growth and reducing the risk of missed spots.
Less Soil Disturbance: Manual aerators generally cause less disruption to the lawn surface compared to powered machines. Hand tools, such as core aerators, remove small plugs of soil, which minimizes the overall disturbance to the grass and soil structure. This gentle approach reduces the risk of damaging the lawn and allows for quicker recovery, making it ideal for lawns that are already in relatively good condition but need periodic maintenance to prevent compaction.
Cost-Effectiveness: Hand aerators are typically more affordable than renting or purchasing powered aerating equipment. For homeowners with smaller lawns or those who prefer a more budget-friendly option, manual aeration tools provide an effective solution without the need for significant financial investment. Additionally, the maintenance costs for manual tools are generally lower, as they do not require fuel or regular servicing like powered equipment.
Environmentally Friendly: Using manual tools for aeration is an environmentally sustainable practice. Hand aeration reduces reliance on fossil fuels, which are used to power many lawn aerating machines. This not only decreases your carbon footprint but also minimizes noise pollution, creating a more pleasant and eco-friendly lawn care routine. For those committed to sustainable gardening practices, manual aeration aligns well with environmentally conscious goals.
Benefits of Machine Aeration
Efficiency: Powered aerators can cover large areas much more quickly than manual tools, making them an excellent choice for homeowners with expansive lawns or commercial properties. The efficiency of powered aeration machines allows for thorough treatment of the lawn in a fraction of the time it would take using manual methods. This is particularly advantageous for those with busy schedules who need to complete lawn care tasks efficiently.
Depth and Consistency: Machine aerators are designed to achieve uniform depth and spacing of aeration holes, ensuring consistent soil disruption and root penetration across the entire lawn. This uniformity is crucial for lawns with significant compaction issues, as it guarantees that the roots receive adequate air, water, and nutrients throughout. The consistent depth provided by machines can also be adjusted based on the severity of compaction, offering a customizable solution for different soil conditions.
Suitability for Heavy-Duty Tasks: For lawns with heavily compacted soils or high-traffic areas, powered aerators provide deeper soil penetration and more effective alleviation of compaction compared to manual tools. The robust design of these machines allows them to handle tough soil conditions that may be difficult to address with manual methods. This makes machine aeration a suitable choice for lawns that require intensive care to restore optimal soil health and grass vitality.
Choosing the Right Method for Your Lawn
When deciding between hand aeration and machine aeration, consider the following factors:
- Lawn Size: For smaller lawns or gardens with complex designs, hand aeration may be sufficient and more manageable. Larger lawns may benefit from the efficiency of powered aeration.
- Soil Condition: If your lawn experiences severe compaction, especially in high-traffic areas, a powered aerator may provide the necessary depth and thoroughness to address the issue effectively.
- Environmental Concerns: If you prioritize sustainable gardening practices, manual aeration aligns better with your environmental values by reducing fuel use and noise pollution.
- Budget: Consider your budget for lawn care equipment. Manual aerators are more cost-effective upfront, while machine aerators may require an initial investment but can save time and labor in the long run.
By weighing these factors, you can select the aeration method that best suits your lawn’s needs and your personal preferences, ensuring a healthy, vibrant lawn that enhances your property’s beauty and value.
Common Mistakes to Avoid During Lawn Aeration
Even with the best intentions, mistakes during lawn aeration can occur, potentially hindering the benefits of this essential lawn care practice. To help you achieve the best results, here are some common mistakes to avoid:
Aerating at the Wrong Time:
Incorrect Seasonal Timing: Aerating during the wrong season can stress your lawn instead of helping it. Always aerate cool-season grasses in early spring or fall and warm-season grasses in late spring or early summer. Avoid aerating during the dormant seasons or extreme weather conditions.
Ignoring Weather Conditions: Performing aeration when the soil is too dry or too wet can reduce the effectiveness of the process. Ensure the soil is moist but not waterlogged to allow for easy penetration of aerating tools and optimal soil disruption.
Using Incorrect Tools or Techniques:
Using Inappropriate Tools: Choosing the wrong aeration tool for your lawn’s specific needs can lead to subpar results. Ensure you use a core aerator for compacted soil and a spike aerator for lighter aeration tasks. For precise spot treatments, consider using a spading fork.
Insufficient Coverage: Failing to cover the entire lawn adequately can result in uneven soil aeration and inconsistent grass growth. Make sure to overlap your passes with the aerator and pay attention to hard-to-reach areas to ensure comprehensive treatment.
Over-Aerating or Under-Aerating:
Over-Aerating: While aeration is beneficial, overdoing it can cause undue stress to your lawn. Aerating too frequently can disrupt the soil structure and damage grassroots. Stick to a recommended schedule of once or twice a year, depending on your lawn’s condition.
Under-Aerating: On the other hand, not aerating often enough can lead to persistent soil compaction and poor grass health. Monitor your lawn for signs of compaction and adjust your aeration frequency accordingly to maintain a healthy lawn environment.
Neglecting Post-Aeration Care:
Skipping Watering: Failing to water your lawn after aeration can slow down the recovery process. Lightly water the lawn to help settle the soil and encourage root growth, ensuring the grass recovers quickly and efficiently.
Ignoring Soil Amendments: Aeration provides an excellent opportunity to improve soil quality by adding amendments like compost or sand. Skipping this step can mean missing out on enhanced soil structure and nutrient availability, which are crucial for optimal grass growth.
Improper Use of Aerator Shoe Spikes:
Over-Reliance on Aerator Shoes: While aerator shoe spikes can be useful for light aeration, relying solely on them for severe compaction issues may not provide sufficient soil relief. Combine their use with more robust aeration methods for comprehensive lawn care.
By avoiding these common mistakes, you can maximize the benefits of lawn aeration and ensure a healthier, more vibrant lawn. Next, we’ll discuss troubleshooting tips for overcoming challenges during the aeration process and ensuring successful outcomes.
Troubleshooting Lawn Aeration Challenges
Despite careful planning and execution, you may encounter challenges during the lawn aeration process. Here are some common issues and troubleshooting tips to help you address them effectively:
Issue: Aerator Tool Difficult to Penetrate Soil
Cause: Soil Too Dry or Compact: If your aerator tool struggles to penetrate the soil, it may be due to extremely dry or compacted soil conditions.
Solution:
- Water the Lawn: Thoroughly water the lawn the day before aeration to moisten the soil, making it easier for the aerator to penetrate.
- Use Proper Tools: For severely compacted soil, consider using a core aerator, which is more effective at breaking up dense soil than a spike aerator.
Issue: Inconsistent Hole Depth
Cause: Uneven Ground or Inconsistent Pressure: Inconsistent hole depth can result from uneven ground or varying pressure applied during aeration.
Solution:
- Level the Lawn: Before aerating, try to level any significantly uneven areas. Use a lawn roller or soil to fill in low spots.
- Maintain Consistent Pressure: Ensure even pressure is applied while using the aerating tool. If using a manual core aerator, press down firmly and consistently with each step.
Issue: Poor Grass Recovery After Aeration
Cause: Insufficient Post-Aeration Care: Lack of proper care following aeration can hinder grass recovery and growth.
Solution:
- Water Regularly: Water the lawn lightly immediately after aeration and continue regular watering to support root growth.
- Apply Soil Amendments: Topdress with compost or sand to enhance soil structure and nutrient content.
- Overseed: Combine aeration with overseeding to introduce new grass varieties and fill in thin or bare patches.
Issue: Persistent Soil Compaction
Cause: High-Traffic Areas or Heavy Soil: Certain areas of your lawn may experience persistent compaction due to high foot traffic or naturally heavy soil.
Solution:
- Increase Aeration Frequency: Consider aerating high-traffic areas more frequently to alleviate persistent compaction.
- Use More Robust Tools: For heavy soils, use a core aerator to remove soil plugs and provide more effective compaction relief.
Tips for Maximizing Aeration Effectiveness
Aeration is a fundamental practice for maintaining a healthy lawn by alleviating soil compaction and promoting robust grass growth. To enhance the effectiveness of hand-aerating efforts, consider implementing these expert tips and techniques:
Cross-Hatching Pattern
To ensure thorough soil disruption and optimal penetration of air, water, and nutrients, adopt a cross-hatching pattern during aeration:
- Process: After completing aeration in one direction across your lawn, repeat the process perpendicular to the initial pattern.
- Benefits: Cross-hatching helps to break up soil compaction more effectively than aerating in a single direction. It ensures that the entire lawn receives uniform aeration, promoting healthier root development and overall lawn vigor.
Adjustable Depth Settings
When using a manual core aerator, adjusting the depth settings is crucial for targeting the root zone effectively:
- Depth Adjustment: Depending on your soil type and current lawn condition, set the aerator to penetrate to a depth of approximately 2-3 inches.
- Purpose: This depth allows the aerator to reach the compacted soil layers where roots struggle to access essential nutrients and moisture. Avoid going too deep, as excessive disruption can harm grass roots and create unnecessary stress for the lawn.
Timing with Other Lawn Care Tasks
Coordinate aeration with other essential lawn care activities to maximize their effectiveness:
- Overseeding: Aerate before overseeding to create optimal conditions for seed-to-soil contact and improve germination rates.
- Fertilizing: Apply fertilizer immediately after aeration to ensure it penetrates deeply into the soil and reaches the root zone more effectively.
- Topdressing: Follow aeration with topdressing (applying a thin layer of compost or soil mix) to further improve soil structure and provide additional nutrients to the grass roots.
Clean and Maintain Aeration Tools
Regular maintenance of your manual aerating tools ensures consistent performance and prolongs their lifespan:
- Tool Care: After each use, clean the aerator by removing soil buildup from the cores or spikes. Use a stiff brush or hose to clean tines thoroughly.
- Sharpening: Periodically inspect the tines or blades of your aerator and sharpen them as needed to ensure clean cuts through the soil. Sharp tools minimize turf damage and improve aeration effectiveness.
- Storage: Store aerating tools in a dry place to prevent rust and degradation. Lubricate moving parts if necessary to maintain smooth operation during future uses.
Implementing these expert tips and techniques will help you achieve maximum effectiveness when aerating your lawn by hand. By adopting a cross-hatching pattern, adjusting depth settings appropriately, timing aeration with other lawn care tasks, and maintaining your aerating tools, you can promote healthy root growth, improve soil structure, and maintain a lush, green lawn throughout the year.
For further guidance on lawn care or to explore more tips tailored to your specific lawn needs, feel free to reach out to us. Happy aerating and enjoy the benefits of a vibrant, thriving lawn!
DIY vs. Professional Aeration: Making the Right Choice
When it comes to aerating your lawn, deciding between DIY (Do-It-Yourself) and hiring a professional service involves considering several key factors. Each approach has its advantages and considerations, tailored to your lawn’s specific needs and your personal preferences.
Cost Considerations
DIY Aeration:
- Cost-Effective: Performing aeration yourself is generally more budget-friendly as it eliminates labor costs associated with hiring a professional.
- Tools Required: Requires investment in manual aerating tools or possibly renting equipment, which can be cost-effective for smaller lawns.
Professional Aeration:
- Expertise and Efficiency: Professionals bring experience and efficiency to the job, ensuring thorough aeration with minimal disruption.
- Cost Factor: Typically more expensive due to labor and equipment costs, particularly beneficial for larger properties or extensive aeration needs.
Decision Point: Choose DIY if you have a smaller lawn or enjoy hands-on lawn care. Opt for professional services for larger properties or when expertise and time efficiency are priorities.
Equipment Access
DIY Aeration:
- Manual Tools: Requires using manual core aerators, spike aerators, or aerator shoe spikes, depending on the level of aeration needed.
- Limitations: Manual tools may be less effective on highly compacted soils or large areas compared to professional equipment.
Professional Aeration:
- Advanced Equipment: Professionals often utilize powered aerators with superior penetration and efficiency.
- Suitability: Ideal for larger properties or lawns with severe compaction issues that require deep soil penetration.
Decision Point: If your lawn has extensive compaction or is larger in size, professional services with advanced equipment can provide more effective results.
Timing and Convenience
DIY Aeration:
- Schedule Flexibility: Allows you to choose the timing that best suits your schedule and lawn care routine.
- Time Investment: Requires dedicating time and effort to perform aeration correctly, particularly for larger or more challenging areas.
FAQs About Lawn Aeration
What is lawn aeration?
Lawn aeration is the process of creating small holes in the soil to allow better uptake of water, nutrients and oxygen to the grass roots. This helps the lawn develop deeper roots and become thicker and healthier over time.
Why is aeration important?
Over time, soil can become compacted from foot traffic or lawn equipment. This compacted soil makes it difficult for grass roots to spread and access the nutrients they need. Aeration alleviates this compaction.
When is the best time to aerate?
The ideal time is during the peak growing season when the grass can recovery quickly. For cool-season grasses, aim to aerate in early spring or fall. For warm-season grasses, late spring through early summer is best.
How often should I aerate my lawn?
Most lawns will benefit from annual aeration. Lawns with heavy clay soil or high foot traffic may need aerating twice per year.
What are the different aeration methods?
The two main methods are core aeration and spike aeration. Core aerators remove actual plugs of soil, while spike aerators just poke holes. Core aeration is considered more effective long-term.
Can I aerate my lawn myself?
You can rent an aerator machine and do it yourself, but proper aeration does require quite a bit of physical labor. Many homeowners opt to hire a professional lawn care service.
How soon after aerating can I fertilize or overseed?
It’s recommended to wait at least 2-4 weeks after aerating to apply fertilizer or overseed to give the soil time to settle. This allows good seed-to-soil contact.
Final Thoughts
Aeration is one of the most important yet often overlooked practices for cultivating a truly lush, healthy lawn. By alleviating compacted soil and giving grass roots access to vital air, water and nutrients, aeration provides a stride-for-stride boost to your lawn’s overall vigor.
While aeration does require some investment of time and effort upfront, the long-term benefits more than justify the labor. A properly aerated lawn will reward you with thicker, more resilient growth, better heat and drought tolerance, improved drainage, and reduced problems with weeds, pests or fungal disease taking hold.
For best results, be sure to choose the optimal aeration timing for your grass type’s peak growth cycle. Commit to aerating at least once annually, or twice yearly for high-traffic areas or lawns with heavier soil compositions like clay. Pair aeration with other lawn care best practices like proper mowing height, fertilization and overseeding for a total turnaround.
If you’re unable or reluctant to take on the aeration task yourself, it’s well worth exploring professional lawn aeration services in your area. Many landscaping companies offer affordable aeration packages to help get your lawn issues in top shape.
Don’t neglect this critical step in nurturing a picturesque, healthy lawn you can truly be proud of. With the right aeration regimen, you’ll be rewarded with the lushest swaths of green on the block. Your lawn will go from so-so to simply sublime.

Leave a Reply