Are sharp mower blades important?
Sharp mower blades are important for several reasons:
Appearance: They prevent ragged-looking turf, ensuring a clean and neat cut for a well-maintained lawn.
Grass Health: Dual blades rip grass instead of cutting it cleanly, leaving torn edges that make the grass susceptible to pests and disease.
Sharpening Technique: Maintaining a 27 to 30 degree angle when sharpening ensures optimal blade performance and longevity.
Avoid Overdoing: Over-sharpening can lead to blade tempering, reducing its effectiveness and lifespan.
Safety: Using bench or angle grinders safely with protective eyewear and gloves minimizes the risk of injury during sharpening.
Debris Removal: A putty knife helps remove debris before sharpening, ensuring a smoother sharpening process.
Proper Installation: Consulting the manual for proper blade installation and tightening blade bolts with a torque wrench ensures secure attachment and prevents issues during operation.
Longevity: Well-maintained blades last longer but have a finite lifespan, necessitating replacement eventually.
Backup Blades: Having extra blades on hand allows for quick replacement, ensuring uninterrupted mowing and convenience. Some professionals keep at least three sets of blades for added convenience and safety.
Signs of a Dull Lawn Mower Blade and Negative Consequences
A sharp lawn mower blade is essential for a healthy and beautiful lawn. It cuts cleanly through grass stems, promoting healthy growth and preventing ragged edges that are susceptible to disease. However, a dull blade can wreak havoc on your lawn, leading to several problems.
Here are some key signs that your lawn mower blade needs sharpening:
Mowing Performance:
- Uneven Cut: The grass appears unevenly cut, with ragged or torn blades.
- Increased Effort: You have to push the mower harder than usual, indicating the blade is struggling to cut through the grass.
- Stalled Mower: In severe cases, a very dull blade can cause the mower to stall or bog down.
Grass Appearance:
- Brown Tips: The grass blades develop brown or yellow tips due to tearing and stress from a dull blade.
- Slow Growth: The lawn appears patchy and slow to grow, as the torn blades struggle to photosynthesize effectively.
- Increased Thatch: Dull blades leave behind ragged grass clippings, which contribute to a thick layer of thatch that smothers the lawn and prevents healthy growth.
Negative Consequences of a Dull Blade:
- Unhealthy Lawn: A dull blade promotes disease and weakens the grass, making it more susceptible to pests and environmental stress.
- Increased Work: Mowing with a dull blade is more time-consuming and requires more effort.
- Damage to Mower: A dull blade puts additional strain on the mower engine, potentially leading to premature wear and tear.
- Safety Hazard: A dull blade can bounce off objects instead of cutting through them, creating a potential safety risk.
By sharpening your lawn mower blade regularly, you can ensure a clean cut, promote healthy grass growth, and extend the lifespan of your mower.
Benefits of Sharpening Your Own Lawn Mower Blades
There are several advantages to taking the initiative and sharpening your own lawn mower blades. Here’s a breakdown of the key benefits:
- Cost-Effective: Sharpening your own blades is significantly cheaper than replacing them entirely. Many lawn mower repair shops offer sharpening services, but these can add up over time. Doing it yourself allows you to save money and keep your lawn looking great without breaking the bank.
- Satisfaction of Self-Reliance: There’s a sense of accomplishment that comes from maintaining your own equipment. Sharpening your blades is a relatively simple task that anyone can learn with a little guidance. By doing it yourself, you gain valuable knowledge about your mower and the satisfaction of knowing you tackled the job successfully.
- Increased Control and Customization: Many professional sharpening services may not offer the level of customization you desire. When you sharpen your own blades, you have complete control over the sharpening angle and the overall sharpness. This allows you to tailor the blade to your specific needs and preferences, ensuring a clean cut for your particular grass type.
- Convenience and Time-Saving: Taking your mower to a repair shop can be inconvenient, especially if you have to wait or schedule an appointment. Sharpening your own blades allows you to tackle the task at your own pace, whenever it’s convenient for you. This can save you time and frustration in the long run.
By taking the time to sharpen your own lawn mower blades, you can enjoy these benefits and contribute to a healthier lawn and a more efficient mowing experience.
Safety First! Essential Gear and Precautions
Before diving into the sharpening process, prioritizing safety is paramount. Here’s what you need to ensure a safe and smooth experience:
Essential Safety Gear:
- Thick Work Gloves:Protect your hands from cuts and scrapes when handling the sharp blade. Opt for gloves that offer good dexterity for a firm grip.
Safety Glasses:Shield your eyes from flying debris or metal fragments. Choose safety glasses with shatterproof lenses and consider goggles for added side protection.
Ear Protection:Protect your hearing from loud noises generated by grinders or power tools. Use earplugs or earmuffs.
Securing the Lawn Mower:
It’s crucial to prevent the mower from accidentally starting while you work on the blade. Here’s how to ensure it’s secure:
- Disconnect the Spark Plug Wire: Locate the spark plug wire on your mower’s engine. This wire delivers the spark that ignites the fuel. Carefully detach the wire from the spark plug to prevent the engine from starting.
- Engage the Parking Brake: Most lawn mowers have a parking brake lever. Engage the brake to ensure the wheels are locked and the mower won’t move unexpectedly.
Removing the Mower Blade:
Consult your user manual for specific instructions on removing your mower blade. The process can vary depending on the model. However, here’s a general guideline:
- Tip the Mower: Tilt the mower on its side, ensuring it’s stable and won’t tip over. Use a block of wood or another object for support if needed.
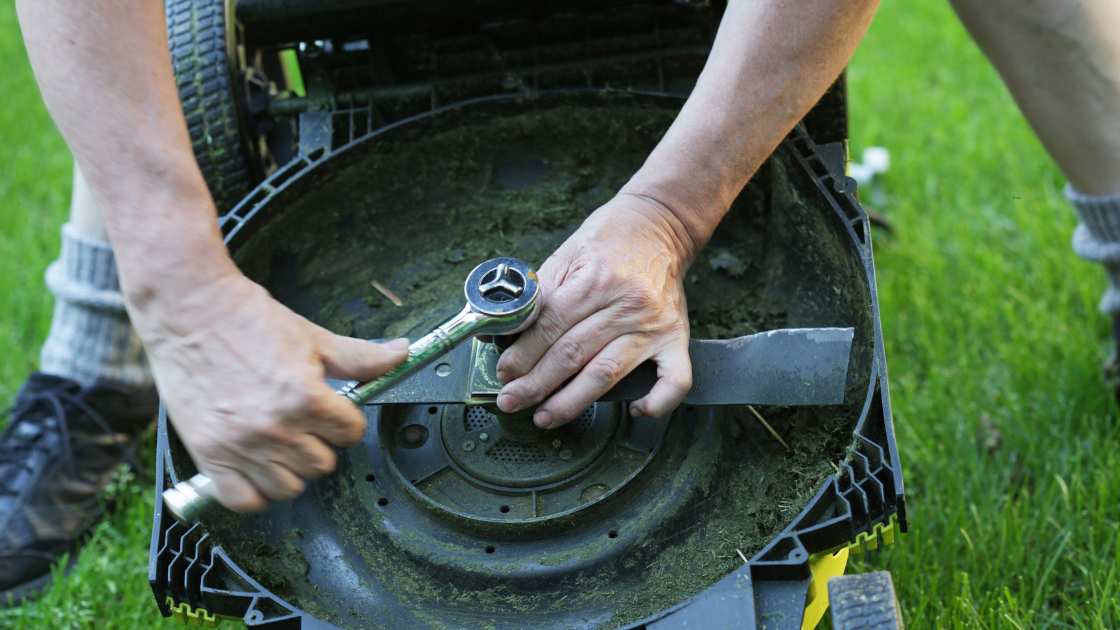
- Locate the Blade Bolt: The blade is typically secured by a bolt in the center. Locate this bolt using your user manual or visually inspect the underside of the mower deck.
- Unscrew the Blade Bolt: Use a wrench or socket set that fits the bolt size snugly. Loosen the bolt by turning it counter-clockwise. Be aware that the blade may be heavy, so have a firm grip when it loosens.
- Carefully Remove the Blade: Once the bolt is loose, lift the blade off the mower deck. Handle the blade with caution as it will be very sharp.
Remember, always refer to your user manual for specific instructions on your mower model to ensure a safe and proper blade removal process.
Sharpening Methods: Choosing Your Weapon
Sharpening your lawn mower blade with a file is a simple and cost-effective method. Here’s a breakdown of the key steps involved:
Choosing the Right File:
- Metal File: Opt for a standard metal file specifically designed for sharpening. Avoid using woodworking files, as they may not be suitable for the hardness of the mower blade.
- Appropriate Coarseness: Select a file with a medium coarseness. A file that’s too coarse can remove too much material quickly, while a very fine file will take a much longer time.
Securing the Blade in a Vise:
For safe and efficient sharpening, it’s essential to secure the blade firmly in a vise. Here’s how:
- Open the Vise Jaws: Open the jaws of your vise wide enough to accommodate the mower blade.
- Position the Blade: Place the flat side of the blade (the side opposite the cutting edge) securely between the vise jaws. Ideally, position the blade so the cutting edge is slightly angled upwards for easier filing.
- Tighten the Vise: Gradually tighten the vise jaws to hold the blade firmly in place. Be careful not to over-tighten and bend the blade.
Maintaining the Original Sharpening Angle:
Maintaining the original sharpening angle of the blade is crucial for a clean and efficient cut. Here’s why it’s important and how to find it:
- Importance: The existing sharpening angle determines the blade’s cutting efficiency. Altering the angle significantly can lead to poor cutting performance or increased wear on the mower engine.
- Finding the Angle: Unfortunately, there’s no universal angle for mower blades. It can vary depending on the manufacturer and mower model. The best way to determine the angle is to consult your user manual. In some cases, the angle might even be etched on the blade itself.
Filing Technique:
Once the blade is secure, it’s time for the sharpening magic! Here’s the proper filing technique:
- One Direction Only: Use the file in one direction only, pushing it along the beveled edge of the blade away from you. Do not use a sawing motion back and forth, as this can dull the blade.
- Maintaining Pressure: Apply firm and consistent pressure throughout the stroke. You should feel the file “bite” into the metal slightly.
- Focus on Maintaining the Angle: Keep the file at the same angle as the existing bevel on the blade. This ensures you’re sharpening the edge without altering the overall angle.
Number of Strokes for a Sharp Edge:
There’s no magic number for strokes, but you’ll want to achieve a sharp, clean edge without removing excessive material. Here’s a general guideline:
- Start with a Few Strokes: Begin with 5-10 strokes on each side of the blade.
- Test the Sharpness: After a few strokes, use your fingernail (carefully!) to test the edge for sharpness. A sharp edge should catch your fingernail slightly.
- Sharpen Gradually: Continue filing in small increments, testing the sharpness after each set of strokes.
- Avoid Over-Sharpening: It’s better to err on the side of caution and avoid over-sharpening. A very sharp blade can be more susceptible to nicks and damage.
Remember, practice makes perfect! With a little patience and these tips, you’ll be sharpening your lawn mower blades like a pro in no time.
Power Sharpening with a Grinder: Faster Sharpening with Increased Caution
While a file offers a more traditional approach, a grinder can be a quicker way to sharpen your lawn mower blade. However, it comes with some added risks and requires more care. Here’s what you need to know:
Suitable Grinders:
- Bench Grinder: A bench grinder is a stationary power tool with two grinding wheels. It provides a stable platform for sharpening and allows for more control over the angle. However, it’s not as portable as other options.
- Angle Grinder with Flap Wheel Attachment: An angle grinder is a handheld power tool that offers more portability. For sharpening mower blades, it’s crucial to use an angle grinder with a flap wheel attachment. This attachment provides a more controlled grinding surface compared to a standard grinding disc.
Safety Considerations (Increased Risk):
Grinders are powerful tools and require heightened safety measures:
- Eye protection is essential to shield your eyes from sparks and debris. Wear safety glasses with shatterproof lenses.
- Ear protection is crucial to prevent hearing damage from the loud noise generated by the grinder. Use earplugs or earmuffs.
- Maintain a firm grip on the grinder to avoid losing control.
- Keep the work area clear of flammable materials, as sparks can ignite them.
- Use caution when grinding: Be mindful of the heat generated and avoid overheating the blade.
Grinding Technique:
- Maintaining the Angle: Similar to using a file, it’s critical to maintain the original sharpening angle of the blade. Refer to your user manual or the existing angle on the blade.
- Light Passes: Use light grinding pressure and short passes to avoid removing too much material or overheating the blade.
- Focus on Consistency: Maintain a consistent angle and pressure throughout the grinding process.
Disadvantage: Potential for Overheating and Damaging the Blade
While faster, grinding poses a higher risk of overheating the blade. Excessive heat can damage the metal, making it brittle and prone to breakage. Here’s why it’s important to be mindful:
- Overheating weakens the blade: Extreme heat can alter the blade’s structure, making it more susceptible to bending or cracking during use.
- Blunting effect: Believe it or not, overheating can actually blunt the blade! The intense heat can cause the metal to lose its sharpness and require replacement.
Remember: It’s always better to take your time and use a more controlled method like a file if you’re unsure about using a grinder.
Balancing the Blade: Ensuring Smooth Operation for a Happy Mower
A balanced blade is just as important as a sharp one for a smooth and safe mowing experience. Here’s why balancing matters and how to achieve it:
Importance of a Balanced Blade:
A balanced blade spins smoothly and evenly, leading to several benefits:
- Reduced Vibration: An unbalanced blade creates excessive vibration during operation. This not only makes mowing less comfortable but can also put stress on the mower engine and shorten its lifespan.
- Improved Safety: A severely unbalanced blade can vibrate violently and potentially detach from the mower, posing a safety hazard.
- Cleaner Cut: A balanced blade cuts grass more cleanly and efficiently, leading to a healthier lawn.
Simple Balancing Test with a Nail and Flat Surface:
Here’s a quick and easy way to check if your blade is balanced:
- Find a Flat Surface: Locate a flat, level surface like a workbench or a sturdy table.
- Nail in the Center: Hammer a nail slightly into the center of the flat surface, leaving enough length for the blade to rest on it.
- Place the Blade on the Nail: Carefully place the center hole of the blade onto the nail, allowing the blade to pivot freely.
Interpreting the Results:
- Balanced Blade: If the blade remains level or wobbles slightly but returns to a center position, it’s balanced.
- Unbalanced Blade: If the blade dips significantly to one side and stays there, it’s unbalanced. The heavier side is the side that dips down.
Adjusting the Blade for Balance:
Here’s how to address an unbalanced blade:
- Identify the Heavier Side: The side that dips down during the test is the heavier side and needs to be filed slightly to remove a small amount of material.
- Filing in Small Amounts: Use a fine-tooth metal file and carefully remove a small amount of material from the outer edge of the heavier side.
- Retest Frequently: After filing a small amount, re-test the balance using the nail method. Repeat the process of filing and testing until the blade balances evenly.
Remember: It’s crucial to remove material only from the outer edge of the heavier side. Filing the inner portion of the blade can significantly alter the cutting angle and compromise its performance.
Reassembly and Aftercare Tips: Keeping Your Blade Sharp and Your Mower Happy
After sharpening and balancing your blade, it’s time to put everything back together and ensure your mower is ready for action. Here’s how to properly reassemble the blade and maintain its sharpness:
Reinstalling the Blade:
- Orientation Matters: Ensure the blade is positioned correctly on the mower deck. The sharpened, beveled edge of the blade should face outwards for proper cutting. Refer to your user manual for specific guidance if needed.
- Slide the Blade On: Carefully slide the blade back onto the mower shaft, aligning the center hole with the shaft key or notch.
- Secure the Blade Bolt: Replace the blade bolt and tighten it securely using a wrench. Consult your user manual for the recommended torque specifications for the blade bolt. Over-tightening can damage the threads, while under-tightening can cause the blade to loosen during operation, creating a safety hazard.
Aftercare Tips for Maintaining Sharp Blades:
- Clean After Use: After each mowing session, take a few minutes to remove grass clippings, dirt, and debris from the blade with a brush or a rag. This will prevent buildup that can dull the blade.
- Proper Storage: Store your mower in a clean, dry place when not in use. Moisture can contribute to rust, which can dull the blade and shorten its lifespan.
- Sharpen Regularly: The frequency of sharpening will depend on how often you mow and the type of grass you have. As a general rule, it’s recommended to sharpen your blades at least once a season, or more often in areas with abrasive soil or tough grass varieties.
By following these simple aftercare tips, you can extend the life of your sharpened blade and ensure a clean, efficient cut for a healthier lawn.
9 Secrets To Keep Your Lawn Green and Healthy
Aerate Your Lawn: Use a tool with sharp metal tines to remove soil plugs, promoting better water, nutrient, and air penetration.
Water Properly: Deeply soak your lawn less frequently to encourage deep root growth, preferably in the early morning.
Avoid Mowing Wet Grass: Mowing wet grass can damage it and create clumps, leading to an uneven appearance and thatch buildup.
Cut Grass at the Right Height: Adjust mower height to maintain grass at 2-3 inches, avoiding both bald spots and hindering water penetration.
Use Natural Lawn Fertilizers: Opt for organic fertilizers to benefit the environment and your lawn’s health, avoiding chemicals that can harm wildlife.
Keep Mower Blades Sharp: Regularly sharpen mower blades to ensure clean cuts and minimize soil disturbance.
Remove Weeds Regularly: Combat weeds to prevent competition for resources and potential disease transmission to your lawn.
“Grass-Cycle” Your Grass Clippings: Leave grass clippings on the lawn to decompose and enrich the soil, acting as natural mulch and reducing the need for fertilizers.
Take Care of Pet Problems: Address pet-related issues promptly, such as urine spots, to prevent damage to your lawn.
FAQs
How often should I sharpen my lawn mower blade?
The frequency of sharpening depends on how often you mow and the type of grass you have. A general recommendation is to sharpen your blades at least once a season, or more often in areas with abrasive soil or tough grass varieties.
Is it better to sharpen my blade myself or take it to a professional?
Sharpening your blade yourself can be a cost-effective and rewarding DIY task. However, it requires some basic tools and knowledge. If you’re comfortable with DIY projects and follow the instructions carefully, you can successfully sharpen your blade at home. If you’re unsure or prefer a professional touch, taking it to a mower repair shop is a good option.
Can I use a sharpening stone instead of a file?
While sharpening stones can be used for sharpening knives and other tools, they are not generally recommended for sharpening lawn mower blades. Sharpening stones can be difficult to maintain the correct angle on a mower blade, and they may not be coarse enough to remove material efficiently.
What if my lawn mower blade is nicked or damaged?
Minor nicks on the blade can sometimes be sharpened out with a file. However, if the blade is severely damaged, bent, or cracked, it’s best to replace it for safety reasons.
Is there anything else I can do to maintain the lifespan of my lawn mower blade?
Yes! Here are some additional tips:
- Avoid hitting objects like rocks or sticks with the mower blade.
- Keep the underside of your mower deck clean and free of grass clippings and debris.
- Store your mower in a clean, dry place when not in use.
By following these tips and regularly sharpening your blade, you can ensure a clean cut, a healthy lawn, and a longer lifespan for your lawn mower.
Final Thought
Sharpening your own lawn mower blades offers a slew of benefits, making it a rewarding endeavor for any DIY enthusiast. Here’s a quick recap of why it’s worth the effort:
- Cost Savings: Professional blade sharpening services can add up over time. By doing it yourself, you save money in the long run.
- Improved Performance: A sharp blade cuts grass cleanly, promoting healthier growth and reducing the risk of lawn diseases. You’ll notice a smoother, more even cut, resulting in a more attractive lawn.
- Time Efficiency: No need to wait for a service appointment or drive to a shop. You can sharpen your blades at your convenience, minimizing downtime and keeping your lawn maintenance schedule on track.
- Extended Lifespan: Regular sharpening extends the lifespan of your mower blades, delaying the need for replacements and saving you even more money in the long term.
- Customization: You can tailor the sharpening process to your specific mower and lawn conditions, ensuring optimal cutting performance for your unique needs.
- Empowerment: Taking care of your lawn mower blades yourself gives you a sense of accomplishment and empowerment. It’s a satisfying feeling knowing you’re maintaining your equipment and keeping it in top shape.
- Environmental Impact: DIY maintenance reduces the need for new equipment and the associated manufacturing processes, contributing to a more sustainable approach to lawn care.
By sharpening your own lawn mower blades, you not only save money and time but also gain a deeper connection to your lawn care equipment and the satisfaction of mastering a valuable maintenance skill. So why wait? Grab your sharpening tools and start reaping the benefits of DIY lawn care today!
Bonus Section: Troubleshooting Common Sharpening Issues
Sharpening your lawn mower blade can be a rewarding DIY task, but even the most meticulous DIYer can encounter some challenges. Here’s a breakdown of some common issues and solutions to help you achieve a perfectly sharpened and balanced blade:
Uneven Sharpening:
- Cause: Applying unequal pressure or using an inconsistent angle while filing or grinding can lead to uneven sharpening.
- Solution:
- Pay close attention to maintaining consistent pressure throughout each stroke.
- Use a reference point, such as the edge of a table, to ensure you’re holding the file or grinder at the same angle throughout the sharpening process.
- After a few strokes, visually inspect the blade for even sharpening progress on both sides.
Difficulty Maintaining the Angle:
- Cause: It can be challenging, especially for beginners, to hold the file or grinder at the exact original angle.
- Solution:
- Use a marker to lightly mark the existing bevel angle on the blade before sharpening. This will serve as a visual reference while sharpening.
- Consider using a sharpening jig or guide. These tools attach to the blade and help maintain the correct angle during filing.
Excessive Blade Vibration After Reassembly:
- Cause: The most likely culprit for excessive vibration after reassembly is an unbalanced blade.
- Solution:
- Double-check your balancing test using the nail method. Ensure the blade pivots freely and rests level on the nail.
- If the blade is still unbalanced after sharpening, you may have removed too much material from one side. Unfortunately, in this case, the blade might be beyond repair and may need to be replaced.
Remember: If you encounter any issues you’re unsure about, it’s always best to err on the side of caution. Consult a professional mower repair shop if you’re uncomfortable proceeding or if the blade appears damaged.


Leave a Reply